![]()
Payment Options
The Payment Options screen lets you determine which options are available for your customers to pay for their purchases.
- PayPal - See Also: PayPal Support
- a Payment Gateway, such as AuthorizeNet - See Also: Payment Gateways
Both options can be enabled, but only one gateway can be enabled at a time.
PayPal Support
“PayPal is an eCommerce business allowing payments and money transfers to be made through the Internet. PayPal serves as an electronic alternative to traditional paper methods such as checks and money orders.
A PayPal account can be funded with an electronic debit from a bank account or by a credit card. The recipient of a PayPal transfer can either request a check from PayPal, establish their own PayPal deposit account or request a transfer to their bank account. PayPal is an example of a payment intermediary service that facilitates worldwide e-commerce.” source: wikipedia
See Also:
- Using PayPal with Ektron CMS400.NET’s eCommerce
- PayPal Documentation
- Enabling PayPal Support
- Customizing the PayPal Page
Using PayPal with Ektron CMS400.NET’s eCommerce
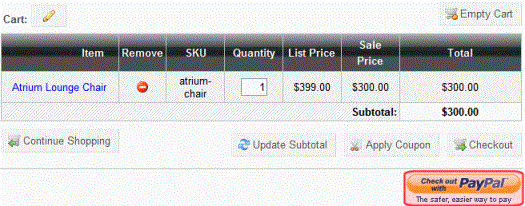
Your customers can use PayPal to pay for purchases from either of two points in the checkout process
- the shopping cart screen
- the payment screen
If a site visitor accesses PayPal via the shopping cart screen, he follows these steps.
See Chart
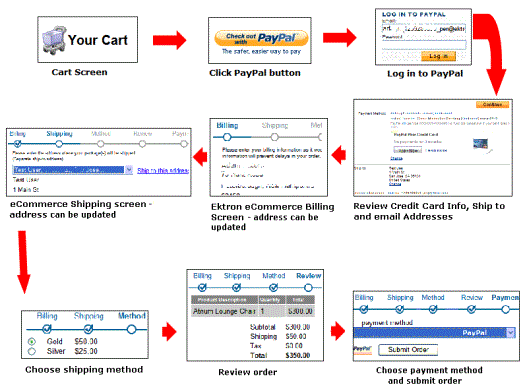
Here is the sequence illustrated above.
1. From the Cart screen, a site visitor clicks PayPal.
2. He logs into his PayPal account.
3. Account information populates the shipping and billing addresses.
4. The site visitor can change addresses if needed.
Note: If the PayPal account address is used for the order, it is saved as part of the site visitor’s Ektron CMS400.NET eCommerce account information.
5. Shipping costs are added.
6. The order is confirmed.
7. Site visitor checks out via PayPal.
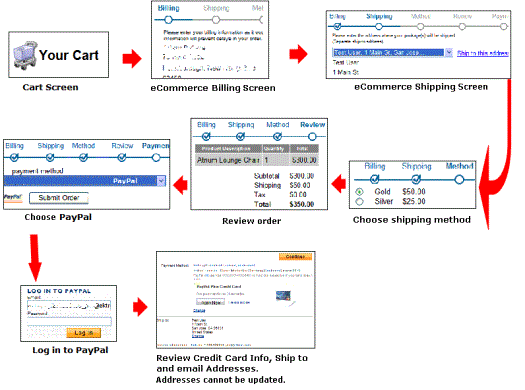
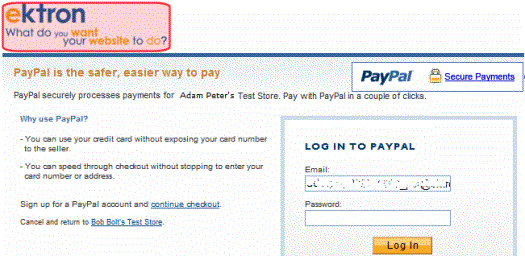
Alternatively, the site visitor can use the standard eCommerce checkout process, select PayPal on the payment screen, and complete his order using the PayPal payment screen. That sequence is illustrated below.
PayPal Documentation
Use the following resources when integrating PayPal into your eCommerce site.
- PayPal Technical Documentation - https://cms.paypal.com/us/cgi-bin/?cmd=_render-content&content_ID=developer/library_documentation
- PayPal Express Checkout Integration Guide - https://cms.paypal.com/cms_content/ennuis/files/developer/PP_ExpressCheckout_IntegrationGuide.pdf
- Payflow ACH Payment Service Guide - https://cms.paypal.com/cms_content/US/en_US/files/developer/PP_ACHPayment_Guide.pdf
Important: PayPal requires you to place the Pay with PayPal option on both the shopping cart and payment screens.
Enabling PayPal Support
To enable PayPal support in Ektron CMS400.NET, follow these steps.
- Create a Sandbox Account. This step includes updating Ektron CMS400.NET’s web.config file.
- Begin Using PayPal
- Enable PayPal in the Ektron CMS400.NET Workarea
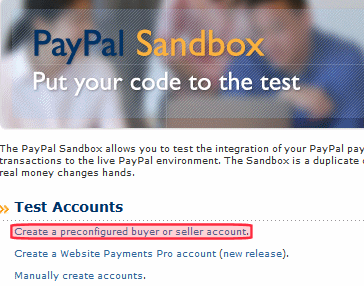
Create a Sandbox Account
1. Sign on to http://www.sandbox.paypal.com.
2. Sign up for an account.
3. You receive an email confirmation that directs you to another page.
4. Log in using the information you provided in Step 2.
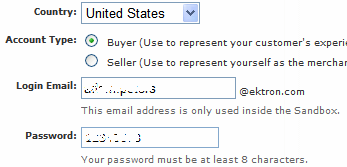
5. Under Test Accounts, click Create a preconfigured buyer or seller account.
6. Create a buyer account. You will use this to test the customer experience.
Note: It's a good idea to change the password to one you can easily remember.
7. Click Home > Test Accounts > Create a preconfigured buyer or seller account.
8. Click Account Type Seller.
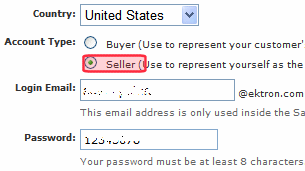
9. Create a seller account. You will use this to test the merchant experience.
Note: It's a good idea to change the password to one you can easily remember.
10. In the upper left corner of the screen, click API Credentials.
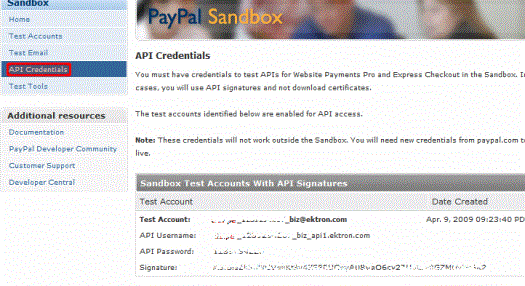
11. Open your siteroot/web.config file.
12. Copy the following values from the API Credentials screen into the web config’s providers/paypal element. Save web.config.
|
PayPal Test Account Value |
web.config PayPal Element |
|
API Username |
PayPalUser |
|
API Password |
PayPalPwd |
|
Signature |
PayPalSignature |
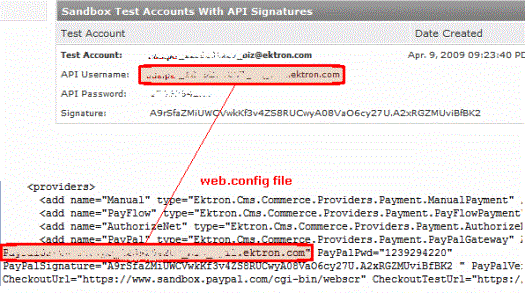
The following illustration shows the PayPal API Username copied into the web.config file’s PayPalUser property.
If you want to encrypt these values, see Encrypting PayPal Authentication Values.
Encrypting PayPal Authentication Values
Follow these steps to encrypt the following values in the web.config file’s providers/paypal element.
- PayPalUser
- PayPalPwd (password)
- PayPalSignature
1. Open the site root/web.config file.
2. Set the AuthValuesEncrypted element to true.

3. Save and close web.config.
4. Open C:\Program Files\Ektron\CMS400v8x\Utilities.
5. Run EncryptEmailPassword.exe.
6. The Encrypt Utility dialog appears.
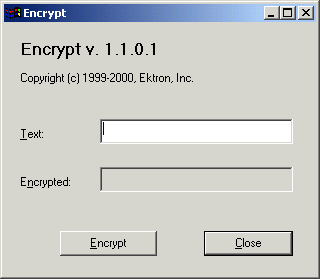
7. Enter the PayPal user name into the Text field.
8. Click Encrypt.
9. The screen displays encrypted text in the Encrypted field.
10. Copy the encrypted text and paste it into the web.config file’s PayPalUser element value.
11. Repeat Steps 7 through 10 for PayPalPwd and PayPalSignature.
Test the Sandbox Account
After creating a sandbox account, you should test it.
1. Sign into the Developer Sample site > eCommerce > Cart.
2. Click PayPal.
3. Enter the buyer account user name and password that you created in Create a Sandbox Account.
4. You proceed to the Ektron CMS400.NET Checkout screen.
After completing these steps, you have verified your PayPal buyer experience and are ready to begin using PayPal.
Begin Using PayPal
1. Sign on to http://www.paypal.com.
2. Create a new account.
3. Follow the instructions to obtain API credentials.
4. Copy the following values from the API Credentials screen to the web config’s providers/paypal element. Save web.config.
|
PayPal Account Value |
web.config PayPal Element |
|
API Username |
PayPalUser |
|
API Password |
PayPalPwd |
|
Signature |
PayPalSignature |
If you want to encrypt these values, see Encrypting PayPal Authentication Values.
5. Enable PayPal in the Ektron CMS400.NET Workarea.
6. If desired, customize the PayPal page on your Web site.
Enable PayPal in the Ektron CMS400.NET Workarea
To enable PayPal in the Ektron CMS400.NET Workarea, follow these steps.
1. From the Ektron CMS400.NET Workarea, choose Settings > Commerce > Configuration > Payment Options.
2. Click Action > Edit Payment options.
3. Check PayPal.
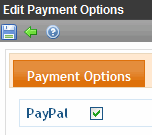
4. Click Save ( ).
).
Customizing the PayPal Page
If you are using Ektron CMS400.NET’s sample site and PayPal is enabled, the login screen contains an Ektron logo for demonstration purposes.
You can replace the logo using the following property of the web.config’s <providers> add name=”PayPal” element.
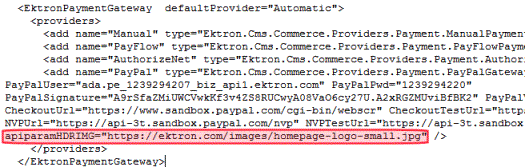
To change the logo, change the referenced image.
To learn how to customize other aspects of the page, see PayPal’s “Express Checkout Integration Guide” section “PayPal Page Style.” (https://cms.paypal.com/cms_content/en_US/files/developer/PP_ExpressCheckout_IntegrationGuide.pdf)
When setting values in the web.config’s providers/add name=” PayPal” element, prefix any variable with apiparam. For example, to set the header background color, enter apiparamHDRBACKCOLOR=”FFF666”.
Payment Gateways
A payment gateway provider is a pluggable component that is integrated into the Ektron CMS400.NET eCommerce module. A payment provider handles eCommerce customer payments by using third-party payment gateways. Ektron CMS400.NET eCommerce module accepts payments such as credit cards or checks. Then, it passes that information to a third-party service. The third-party service processes the payment and returns a transaction ID that is stored with the customer's order.
Your company needs to set up an account with a third party payment service before using the payment provider. Ektron CMS400.NET provides four standard payment gateways: authorize.net, Payflow, Sage Pay and PayFlowWebsite Payments Pro along with manual. The manual gateway accepts all credit cards. In this case, the merchant emails the credit card information to the credit card company. You can customize these providers or create your own using the extendable Payment Gateway Provider architecture. See Customizing the Payment Gateway Provider.
In addition, some payment gateways might support recurring payments, while others might not. Recurring payments let you create a payment that recurs at a given interval for a specified period of time. For example, you could create a payment for $9.99 that occurs on the first of every month for the next 12 months. This is something to consider if your site relies on a subscription service.
Ektron CMS400.NET lets you edit information on any provided gateway as well as create a new one.
See Also:
- How a Payment Gateway Works
- The Default Gateway
- Adding a Payment Gateway
- Editing a Payment Gateway
- Deleting a Payment Gateway
- Check Support
- Credit Card Types
- PayPal Support
How a Payment Gateway Works
Processing Credit Card Transactions
The following sequence explains typical processing of credit card transactions. (source: www.authorize.net)
- A customer purchases a product from your site and submits payment information.
- Ektron CMS400.NET passes the information to your payment gateway.
- The payment gateway provider (PGP) receives secure transaction information and passes it via secure connection to the Merchant Bank’s Processor.
- The Merchant Bank’s Processor submits the transaction to the Credit Card Interchange (a network of financial entities that manage credit card transactions).
- The Credit Card Interchange sends the transaction to the customer’s Credit Card Issuer.
- The Credit Card Issuer approves or declines the transaction, based on the customer’s available funds. It then passes the transaction results and, if approved, the appropriate funds back through the Credit Card Interchange.
- The Credit Card Interchange relays the transaction results to the Merchant Bank’s Processor.
- The Merchant Bank’s Processor relays the transaction results to PGP.
- The PGP stores transaction results and sends them to the customer and/or the merchant. This communication process averages three seconds or less.
- The Credit Card Interchange passes the transaction’s funds from the Credit Card Issuer to the merchant’s bank account.
Processing Check Transactions
The following sequence explains how a payment gateway processes checks. (source: www.authorize.net)
- Customer authorizes merchant to charge his bank account for an amount.
- Order and payment information is securely transmitted via the Internet to the payment gateway.
- The transaction is accepted or rejected based on initial data validation and security criteria defined by the payment gateway.
- If accepted, the transaction is sent to the ACH Network for settlement.
- The ACH Network uses the transaction’s bank account information to determine the bank that holds the customer’s account (the RDFI).
- The ACH Network instructs the RDFI to charge or refund the customer’s account.
- The RDFI transfers funds from the customer’s account to the ACH Network. The RDFI also notifies the ACH Network of any returns (if funds could not be collected from the customer’s bank account) or charge backs (if a customer disputes a purchase).
- The ACH Network transfers funds for the transaction to the payment gateway’s bank.
- After a holding period, the payment gateway provider initiates a ACH transaction that deposits the funds into the merchant’s bank account.
Establishing a Relationship with a Payment Gateway Provider
You need to set up an account with a third-party payment service before using a payment provider. Each payment gateway provider accepts configuration parameters. For example, Authorize.NET requires a username and password, while PayFlow requires a Username, password, vendor, and partner.
In addition, some payment gateways do not support subscription payments. Consider this if your site relies on subscriptions. See Also: Creating a Subscription
The Default Gateway
The eCommerce checkout uses the default gateway only. Additional gateways are unused unless one is changed to the default.
You cannot delete the default gateway. If you want to delete it, you must first make another gateway the default.
To change the default gateway, follow these steps.
1. Go to Settings > Commerce > Configuration > Payment Options.
2. Click the Payment Gateways tab.
3. The currently-defined default has a check in the Default column.
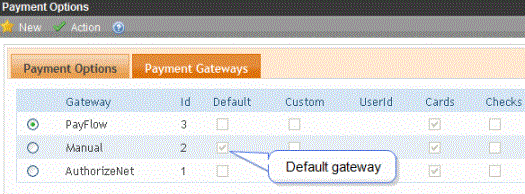
4. Click the radio button next to the gateway you want to make the default.
5. Choose Action > Mark as Default.
6. A confirmation message appears. Click OK.
Adding a Payment Gateway
Note: To create a new payment gateway provider, see Customizing the Payment Gateway Provider.
To add a new payment gateway to Ektron CMS400.NET, follow these steps. See Also: Payment Options
1. In Ektron CMS400.NET, go to Settings > Commerce > Configuration > Payment Options.
2. Choose New > Payment Gateway.
3. Use the following table to complete the screen.
|
Field |
Description |
|
Name |
Enter the name of the gateway. |
|
Default |
Check this box if this is the default gateway. If you do, and another gateway is currently the default, it is replaced by this one. See Also: The Default Gateway |
|
User ID |
Enter your User ID. This ID will identify your account with this gateway provider. |
|
Password |
Enter the password for your account with this gateway provider. |
|
Expand Custom Values |
If this gateway provider needs additional fields of information, enter those values into the Custom 1 and Custom 2 fields. |
|
Credit Cards |
Check if this payment gateway accepts credit cards. |
|
Checks |
Check if this payment gateway accepts checks. |
The following sections explain how to set up standard Payment gateways.
- Setting up a PayFlow Payment Gateway
- Setting up a PayFlowWebsite Payments Pro Payment Gateway
- Setting up a Authorize.Net Payment Gateway
- Setting up a SagePay Payment Gateway
Note: When setting up a payment gateway, you are asked to enter authentication codes, such as user name and password. To keep them safe, Ektron CMS400.NETencrypts these values when saving them to the database.
Setting up a PayFlow Payment Gateway
When setting up a PayFlow payment gateway, follow these steps.
1. Set up an account with PayFlow. To do this, go to https://www.paypal.com/cgi-bin/webscr?cmd=_payflow-gateway-overview-outside. During this process, you should obtain a Login ID and password.
2. Go to Settings > Commerce > Configuration > Payment Options.
3. Choose New > Payment Gateway.
4. Enter these values on the screen.
See Also: PayFlow's Web site for additional instructions on setting up the PayFlow Gateway.
|
Field |
Description |
|
Name |
Choose Payflow. |
|
Default |
Check this box to make PayFlow the default gateway. See Also: The Default Gateway |
|
User ID |
Enter the user ID provided to you by the authorized PayPal Reseller who registered you for the Payflow SDK. If you purchased your account directly from PayPal, use PayPal. Limitations: Sixty-four alphanumeric, case-sensitive characters. |
|
Password |
Enter the password you defined while registering for account. Limitations: Six- to thirty-two alphanumeric, case-sensitive characters |
|
Expand Custom Values |
Click this text to open the Custom 1 and Custom 2 fields. |
| Custom 1 |
Enter the merchant login ID sent to you when you registered the account. Limitations: Sixty-four alphanumeric, case-sensitive characters. |
| Custom 2 |
Enter the Partner ID sent to you by the authorized PayPal Reseller who registered you for the Payflow SDK. If you purchased your account directly from PayPal, use PayPal. Limitations: Twelve alphanumeric, case-sensitive characters. |
|
Credit Cards |
Check if this payment gateway accepts credit cards. Note: Ektron recommends verifying that this payment gateway supports credit card payments. |
|
Checks |
Check if you will accept checks with this payment gateway. Note: Ektron recommends verifying that this payment gateway supports check payments. |
Setting up a PayFlowWebsite Payments Pro Payment Gateway
The PayFlowWebsite Payments Pro payment gateway is used in the United Kingdom and Australia.
1. Set up an account with PayFlowWebsite Payments Pro. To do this, go to https://cms.paypal.com/us/cgi-bin/?&fli=true&cmd=_render-content&content_ID=developer/howto_gateway_payflow_wpp&bn_r=o.
2. In the Ektron CMS400.NET Workarea, go to Settings > Commerce > Configuration > Payment Options.
3. Choose New > Payment Gateway.
4. Enter these values on the screen.
|
Field |
Description |
|
Name |
Choose PayFlowWebsite Payments Pro. |
|
Default |
Check this box to make PayFlow the default gateway. See Also: The Default Gateway |
|
User ID |
Enter the API username sent to you by the authorized PayPal Reseller who registered you for the Payflow SDK. For example, sellUK_1271963915_biz_api1.ektron.com. If you purchased your account directly from PayPal, use PayPal. Limitations: Sixty-four alphanumeric, case-sensitive characters. |
|
Password |
Enter the API password you defined while registering for the account.For example,1234567891. Limitations: Six- to thirty-two alphanumeric, case-sensitive characters |
|
Expand Custom Values |
Click this text to open the Custom 1 and Custom 2 fields. |
| Custom 1 |
Enter the API signature sent to you by the authorized PayPal Reseller who registered you for the Payflow SDK. For example, AAAAAAAAAAAAAAAAAAAAAAAAAAAAAAAAAAAAAAAA Limitations: Sixty-four alphanumeric, case-sensitive characters. |
| Custom 2 |
Not used |
|
Credit Cards |
Check if this payment gateway accepts credit cards. Note: Ektron recommends verifying that this payment gateway supports credit card payments. |
After defining the payment gateway, you typically want to test it. See Testing a Payment Gateway
Setting up a Authorize.Net Payment Gateway
1. Set up an account with AuthorizeNet. To do this, go to http://www.authorize.net/solutions/merchantsolutions/. During this process, you should obtain a Login ID and password.
2. In Ektron CMS400.NET, go to Settings > Commerce > Configuration > Payment Options.
3. Choose New > Payment Gateway.
4. Enter these values on the screen.
|
Field |
Description |
|
Name |
Choose Authorize.Net. |
|
Default |
Check this box to make Authorize.Net the default gateway. See Also: The Default Gateway |
|
User ID |
Enter the Login ID you obtained in Step 1. |
|
Password |
Enter the password you obtained in Step 1. |
| Custom 1 |
Warning! This field is not used with Authorize.Net. |
| Custom 2 |
Warning! This field is not used with Authorize.Net. |
|
Credit Cards |
Check if you will accept credit cards with this payment gateway. Note: Ektron recommends verifying that this payment gateway supports credit card payments. |
Note: This gateway accepts only credit cards. No checks.
After defining the payment gateway, you typically want to test it. SeeTesting a Payment Gateway
Setting up a SagePay Payment Gateway
Note: SagePay does not support recurring billing.
1. Set up an account with SagePay. To do this, go to http://www.sagepay.com/products_services/bolt_ons/merchant_services. During this process, you should obtain a Login ID and password.
2. In Ektron CMS400.NET, go to Settings > Commerce > Configuration > Payment Options.
3. Choose New > Payment Gateway.
4. Enter these values on the screen.
|
Field |
Description |
|
Name |
Choose SagePay. |
|
Default |
Check this box to make SagePay the default gateway. See Also: The Default Gateway |
|
User ID |
Enter the User ID you obtained in Step 1. |
|
Password |
Warning! This field is not used with SagePay. |
| Custom 1 |
Warning! This field is not used with SagePay. |
| Custom 2 |
Warning! This field is not used with SagePay. |
|
Credit Cards |
Check if this payment gateway accepts credit cards. Note: Ektron recommends verifying that this payment gateway supports check payments. |
|
Checks |
Check if you will accept checks with this payment gateway. Note: Ektron recommends verifying that this payment gateway supports check payments. |
After defining the payment gateway, you typically want to test it. SeeTesting a Payment Gateway and Testing SagePay Payment Gateway
Testing a Payment Gateway
Typically, you will test a new default payment gateway before going live with it. eCommerce provides a test mode for this purpose.
When in test mode, customers have no payment gateway with which to purchase goods. Be sure turn off test mode before going live with a new default payment gateway.
To test a payment gateway, open the siteroot/web.config file and set <ektronCommerce> ek_ecom_TestMode to true. See example below.
<ektronCommerce>
   <add key="ek_ecom_ComplianceMode" value="false" />
   <!-- This is used only when compliance mode is on, and cannot be less than 4. -->
   <add key="ek_ecom_PasswordHistory" value="4" />
   <add key="ek_ecom_OrderProcessingDisabled" value="false" />
   <add key="ek_ecom_TestMode" value="true" />
    ....
When .testing is done, change the value of ek_ecom_TestMode to false.
Testing SagePay Payment Gateway
If you are testing the SagePay Payment Gateway, follow these steps.
1. Follow instructions in Testing a Payment Gateway .
2. Open your siteroot/web.config file.
3. Set <EktronPaymentGateway>/<providers> SagePay SimulatorMode to true. See example below.
<EktronPaymentGateway defaultProvider="Automatic">
   <providers>
       .
       .
      <add name="SagePay" type="Ektron.Cms.Commerce.Providers.Payment.SagePayGateway"
       SagePayVersion="2.23" SimulatorMode="true" Description="Ektron CMS Order" />
    </providers>
</EktronPaymentGateway>
4. When testing is complete, change the value of SimulatorMode to false.
Editing a Payment Gateway
Follow these steps to edit a payment gateway. See Also: Payment Options
- Go to Ektron CMS400.NET Workarea > Settings > Commerce > Configuration > Payment Options.
- Click the payment gateway that you want to edit.
- Click Edit (
 ).
). - Edit any of the fields, which are described in Use the following table to complete the screen..
- Click Save ().
Deleting a Payment Gateway
Follow these steps to delete a payment gateway.
Note: You cannot delete the default gateway. If you want to delete it, you must first make another gateway the default.
See Also: Payment Options
- From Ektron CMS400.NET Workarea, choose Settings > Commerce > Configuration > Payment Options.
- Click the payment gateway that you want to delete.
- Click Delete (
 ).
). - A confirmation message appears. Click OK.
- The payment gateway is deleted.
Check Support
Payment gateways generally offer two payment mechanisms: credit cards and checks. You can enable or disable check support for a gateway via the Settings > Commerce > Configuration > Payment options > Edit Payment Gateway screen (shown below).
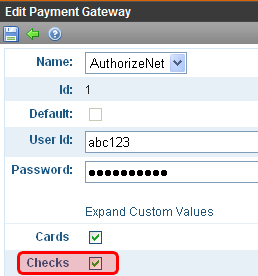
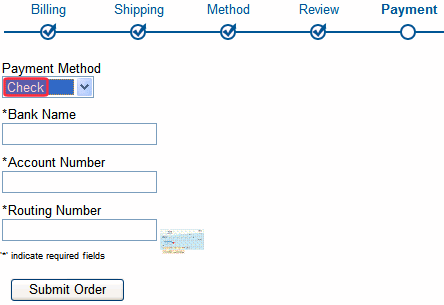
If checks are enabled for the default payment gateway, a site visitor can pay by Check on the payment screen (illustrated in the following figure). If check support is not enabled, the Payment Method field does not appear.
Check Support Integration Documentation
Use the following resources to familiarize yourself with integrating checks into your eCommerce site.
- Authorize.Net: http://www.authorize.net/files/echecknetuserguide.pdf
- PayFlow: https://cms.paypal.com/cms_content/US/en_US/files/developer/PP_PayflowLink_Guide.pdf ; see the chapter “Integrating TeleCheck Transactions.”
Effect of Check Payment on Order Processing
The following describes a typical sequence of events when processing a check for eCommerce payment.
However, Ektron CMS400.NET is very flexible and does not enforce this sequence. For example, you can enter a tracking number and mark an order shipped even though its payment has not been captured yet.
1. eCommerce user accesses the View Payment screen’s Capture option, which submits a payment request to the customer’s bank.
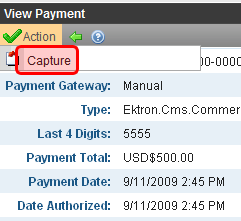
2. A few days later, the funds are transferred to the merchant’s account.
3. eCommerce user accesses the View Payment screen’s Mark as Settled option to confirm the receipt of funds.
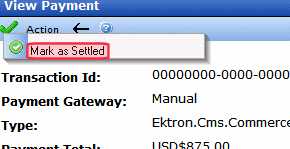
4. If goods are tangible
- eCommerce user ships the merchandise, using the View Payment screen’s Enter Tracking Number option to insert the tracking number and confirm the shipment.
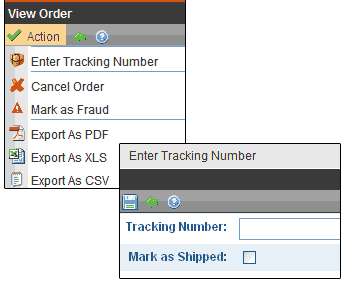
If goods are not tangible
- The workflow sends the customer an email with purchase details, such as how to download it.


![]()